AWS-Powered Next-Gen KYC: How to Build A Secure and Scalable Image Processing Pipeline with Serverless Architecture
In the digital age, verifying the identity of users is crucial for ensuring security, compliance, and trust. Know Your Customer (KYC) processes have become a vital part of various industries, including finance, healthcare, and e-commerce. These processes help organizations verify the identity of their clients, comply with regulatory requirements, and prevent fraud. However, traditional KYC methods can be cumbersome, time-consuming, and costly.
To address these challenges, I present to you a cutting-edge solution powered by AWS (Amazon Web Services). This guide outlines how to build a next-generation KYC system using AWS's serverless architecture, which provides a secure, scalable, and efficient image processing pipeline. By leveraging the power of AWS, we can automate and streamline the KYC process, reducing operational overhead while enhancing security and reliability.
Overview of the Architecture:
Our AWS-powered KYC system employs a serverless architecture that integrates several AWS services to handle image uploads, processing, validation, and notifications seamlessly. Below is an overview of the key components and their roles within the architecture:
- API Gateway:
- Role: Serves as the entry point for client applications to upload images and documents.
- Functionality: Provides a RESTful API endpoint that clients can use to submit KYC data. It also handles request validation, throttling, and security.
- AWS Lambda:
- Role: Executes backend logic in response to events triggered by API Gateway, S3, and SNS.
- Functionality: Runs code for various KYC tasks, including uploading images (
upload_image), processing images (process_image), and validating results (validate_image). Lambda functions scale automatically with the volume of requests, ensuring efficient processing. We can also easily manage concurrency and throttling in lambda functions.
- Amazon S3:
- Role: Securely stores uploaded images and documents.
- Functionality: Acts as a storage solution where client-uploaded images are stored. It triggers Lambda functions upon new uploads, ensuring that the images are processed promptly.
- AWS Rekognition:
- Role: Provides advanced image analysis capabilities.
- Functionality: Analyzes uploaded images to detect text, compare faces, and extract relevant information required for KYC verification. This service enhances the accuracy and speed of the verification process.
- Amazon DynamoDB:
- Role: Manages real-time data storage and retrieval.
- Functionality: Stores KYC data, including image processing results and user information. DynamoDB's fast and scalable nature ensures that data retrieval and updates are efficient, supporting real-time decision-making.
- Amazon SNS:
- Role: Facilitates real-time notifications and alerts.
- Functionality: Sends notifications about the status of image processing and KYC verification. SNS topics are used to trigger further actions, such as validation or user notifications, based on processing results.
Detailed Architectural Flow:
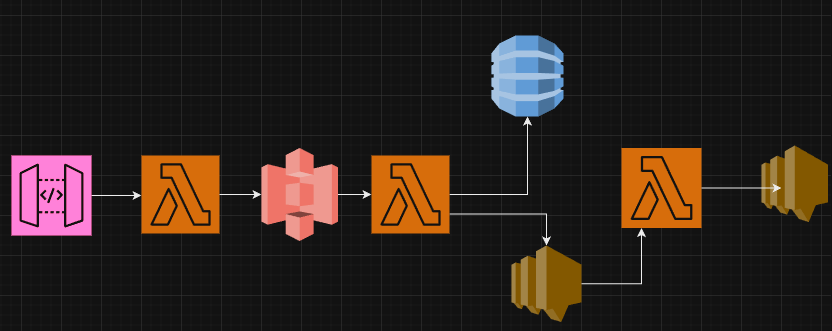
- Image Upload:
- Users upload images through the API Gateway, which forwards the requests to the
upload_imageLambda function.
- Users upload images through the API Gateway, which forwards the requests to the
- Image Storage and Processing Trigger:
- The
upload_imageLambda function stores the images in an S3 bucket. S3 events trigger theprocess_imageLambda function for processing.
- The
- Image Processing:
- The
process_imageLambda function utilizes AWS Rekognition to analyze the images. It extracts necessary information, compares faces, and validates the data against predefined criteria. It uploads this processed image back to s3 while deleting the original image. - The processed data is then stored in a DynamoDB table.
- The
- Validation and Notification:
- Once processing is complete, the
process_imageLambda function publishes a message to an SNS topic. - The
validate_imageLambda function, subscribed to the SNS topic, retrieves the message and checks the results stored in DynamoDB. Based on the validation outcome, it sends a success or failure notification to respective SNS topics.
- Once processing is complete, the
- User Notification:
- Depending on the final outcome, teams or downstream processing services are notified through the relevant SNS topics, completing the automated phase of the KYC process.
Remember that this is a proof-of-concept. You can find production-ready architectures here.
Step-by-Step Implementation Guide
Before we begin, please note that I didn't discuss IAM roles and policies. I expect that you should be able to add the required IAM roles where necessary, without guidance.
Step1: Create the S3 bucket
On the S3 Console, click on "Create Bucket"
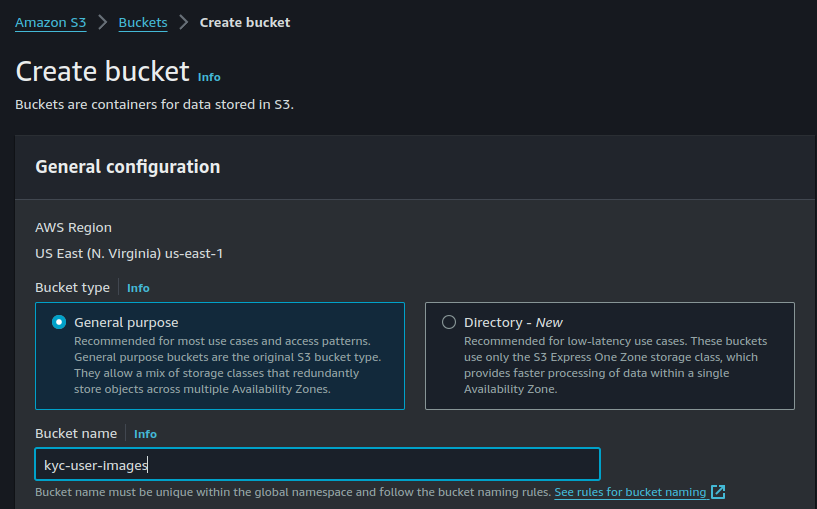
Remember that bucket name must be globally unique. So you must choose a different, unique name.
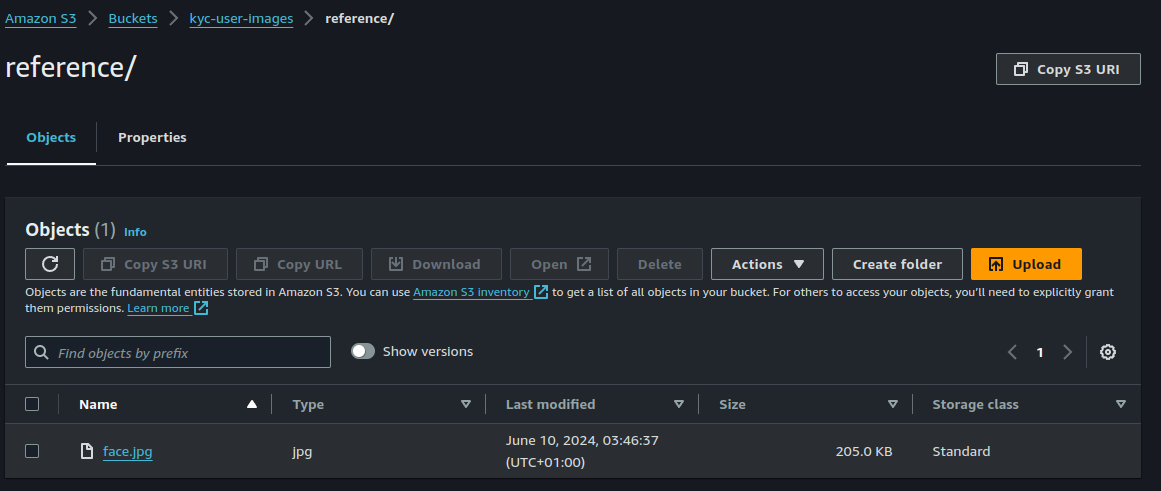
Also upload a refrence image to your bucket reference/face.jpg.
We'll come back to update the bucket's resource based polices and to set up event notifications.
Step 2: Create the lambda functions.
The upload_image Lambda function is responsible for handling the image upload process initiated by the API Gateway. Its main tasks include receiving the image from the API Gateway request, storing the image in an S3 bucket, and triggering the next step in the processing pipeline.
import json
import base64
import boto3

s3_client = boto3.client('s3')

def lambda_handler(event, context):
    # Extract image data from the API Gateway event
    try:
        body = json.loads(event['body'])
        image_data = body['image_data']
        user_id = body['user_id']  # Assuming user ID is passed along with the image
    except (json.JSONDecodeError, KeyError) as e:
        return {
            'statusCode': 400,
            'body': json.dumps('Invalid input')
        }

    # Decode the base64-encoded image data
    try:
        image_bytes = base64.b64decode(image_data)
    except base64.binascii.Error as e:
        return {
            'statusCode': 400,
            'body': json.dumps('Invalid base64 image data')
        }

    # Generate a unique key for the image in S3
    image_key = f'kyc/{user_id}/{context.aws_request_id}.jpg'

    # Upload the image to the S3 bucket
    try:
        s3_client.put_object(
            Bucket='your-s3-bucket-name',
            Key=image_key,
            Body=image_bytes,
            ContentType='image/jpeg'
        )
    except Exception as e:
        print(e)
        return {
            'statusCode': 500,
            'body': json.dumps('Failed to upload image')
        }

    # Return success response
    return {
        'statusCode': 200,
        'body': json.dumps({'message': 'Image uploaded successfully', 'image_key': image_key})
    }
The process_image Lambda function is a crucial component in the AWS-powered KYC architecture. Its primary responsibilities include processing the uploaded image, analyzing it using AWS Rekognition, storing the results in DynamoDB, deleting the original image from S3, and publishing the results to an SNS topic.
import json
import boto3
import random
import string

s3_client = boto3.client('s3')
rekognition_client = boto3.client('rekognition')
dynamodb = boto3.resource('dynamodb')
sns_client = boto3.client('sns')

DYNAMODB_TABLE_NAME = 'KYCResults'
SNS_TOPIC_ARN = 'arn:aws:sns:your-region:your-account-id:ImageProcessingTopic'
REFERENCE_IMAGE_BUCKET = 'your-reference-bucket'
REFERENCE_IMAGE_KEY = 'reference/face.jpg'

def lambda_handler(event, context):
    # Extract information from the S3 event
    for record in event['Records']:
        bucket_name = record['s3']['bucket']['name']
        object_key = record['s3']['object']['key']

        # Assuming the user_id is part of the object key path, e.g., 'uploads/{user_id}/image.jpg'
        user_id = object_key.split('/')[1]

        # Download the image from S3
        response = s3_client.get_object(Bucket=bucket_name, Key=object_key)
        image_data = response['Body'].read()

        # Detect faces in the image using AWS Rekognition
        face_detection_response = rekognition_client.detect_faces(
            Image={'Bytes': image_data},
            Attributes=['ALL']
        )

        if face_detection_response['FaceDetails']:
            # If a face is detected, set extracted_text to "expected text"
            extracted_text = "expected text"

            # Compare the detected face with the reference image
            reference_image_response = s3_client.get_object(
                Bucket=REFERENCE_IMAGE_BUCKET, Key=REFERENCE_IMAGE_KEY)
            reference_image_data = reference_image_response['Body'].read()

            comparison_response = rekognition_client.compare_faces(
                SourceImage={'Bytes': reference_image_data},
                TargetImage={'Bytes': image_data}
            )

            if not comparison_response['FaceMatches']:
                # If the face does not match the reference image, set extracted_text to random text
                extracted_text = ''.join(random.choices(string.ascii_letters + string.digits, k=10))
        else:
            # If no face is detected, set extracted_text to random text
            extracted_text = ''.join(random.choices(string.ascii_letters + string.digits, k=10))

        # Store the processing result in DynamoDB
        table = dynamodb.Table(DYNAMODB_TABLE_NAME)
        table.put_item(Item={
            'UserId': user_id,
            'ImageKey': object_key,
            'ExtractedText': extracted_text,
            'ProcessingStatus': 'Completed'
        })

        # Delete the original image from S3
        s3_client.delete_object(Bucket=bucket_name, Key=object_key)

        # Publish a message to the SNS topic
        message = {
            'user_id': user_id,
            'image_key': object_key,
            'extracted_text': extracted_text
        }
        sns_client.publish(
            TopicArn=SNS_TOPIC_ARN,
            Message=json.dumps(message)
        )

    return {
        'statusCode': 200,
        'body': json.dumps('Image processed and results stored successfully')
    }
The validate_image Lambda function in the serverless KYC architecture is responsible for validating the results of image processing and determining whether the KYC verification was successful or not.
import json
import boto3

dynamodb = boto3.resource('dynamodb')
sns_client = boto3.client('sns')

DYNAMODB_TABLE_NAME = 'KYCResults'
SUCCESS_TOPIC_ARN = 'arn:aws:sns:your-region:your-account-id:ImageProcessingSuccessTopic'
FAILURE_TOPIC_ARN = 'arn:aws:sns:your-region:your-account-id:ImageProcessingFailureTopic'

def lambda_handler(event, context):
    for record in event['Records']:
        # Get the SNS message
        sns_message = json.loads(record['Sns']['Message'])
        user_id = sns_message['user_id']
        image_key = sns_message['image_key']
        extracted_text = sns_message['extracted_text']

        # Retrieve the processing result from DynamoDB
        table = dynamodb.Table(DYNAMODB_TABLE_NAME)
        response = table.get_item(Key={'ImageKey': image_key, 'UserId': user_id})
        item = response.get('Item')

        # Validate the image processing result
        if item and 'ExtractedText' in item:
            # Dummy validation logic
            if extracted_text == "expected text":
                validation_status = 'Success'
                sns_client.publish(
                    TopicArn=SUCCESS_TOPIC_ARN,
                    Message=json.dumps({
                        'user_id': user_id,
                        'image_key': image_key,
                        'status': validation_status
                    })
                )
            else:
                validation_status = 'Failure'
                sns_client.publish(
                    TopicArn=FAILURE_TOPIC_ARN,
                    Message=json.dumps({
                        'user_id': user_id,
                        'image_key': image_key,
                        'status': validation_status
                    })
                )
        else:
            validation_status = 'Failure'
            sns_client.publish(
                TopicArn=FAILURE_TOPIC_ARN,
                Message=json.dumps({
                    'user_id': user_id,
                    'image_key': image_key,
                    'status': validation_status
                })
            )

    return {
        'statusCode': 200,
        'body': json.dumps('Validation process completed')
    }
Step3: Setup the API Gateway
The Amazon API Gateway serves as a crucial component in this serverless KYC architecture by providing a secure, scalable, and managed entry point for clients to interact with the backend services. Here's a detailed look at what the API Gateway does in this pipeline:
Detailed Responsibilities of API Gateway:
- Handles Client Requests:
- Entry Point: Acts as the entry point for clients (e.g., web or mobile applications) to submit KYC data, including images.
- Endpoints: Provides RESTful API endpoints that clients can use to upload images and initiate the KYC process.
- Request Validation:
- Input Validation: Validates incoming requests to ensure they contain the required parameters and data formats (e.g., checking for the presence of the image data and user ID).
- Security: Implements security features such as request throttling, API keys, and authorization mechanisms to protect against unauthorized access and abuse.
- Integration with Lambda:
- Trigger Lambda Functions: Configured to trigger the
upload_imageLambda function when a request is received at the designated endpoint. - Payload Transformation: Transforms the incoming request payload (if necessary) to match the expected input format of the Lambda function.
- Trigger Lambda Functions: Configured to trigger the
- Response Handling:
- Return Responses: Collects the responses from the Lambda functions and forwards them back to the client. This includes handling success and error responses appropriately.
- Monitoring and Logging:
- Metrics and Logs: Provides built-in monitoring and logging capabilities using Amazon CloudWatch, enabling you to track usage metrics, error rates, and performance data.
- Create a REST API:
- Open the API Gateway Console.
- Click on "Create API" and choose "REST API" (Choose the "New API" option).
- Give it a name (e.g.,
KYCImageUploadAPI) and click "Create API".
- Create a Resource:
- In the API Gateway console, click on your newly created API.
- Under the "Resources" section, click "Actions" and then "Create Resource".
- Enter a Resource Name (e.g.,
upload) and Resource Path (e.g.,/upload). - Click "Create Resource".
- Create a POST Method:
- Select the
/uploadresource. - Click "Actions" and then "Create Method".
- Choose
POSTfrom the dropdown menu and click the checkmark.
- Select the
- Set Up the POST Method:
- For Integration Type, choose "Lambda Function".
- Check the box for "Use Lambda Proxy integration".
- In the Lambda Function field, enter the name of your Lambda function (e.g.,
upload_image). - Click "Save". If prompted to give API Gateway permission to invoke your Lambda function, click "OK".
- Enable Binary Media Types:
- In the API Gateway console, select your API.
- Click on "Settings" in the left-hand menu.
- In the "Binary Media Types" section, add
image/jpegand click "Save Changes".
- Deploy the API:
- Click on "Actions" and then "Deploy API".
- Create a new stage (e.g.,
prod). - Click "Deploy".
- Note the Invoke URL:
- After deployment, note the "Invoke URL" for the API. This URL will be used to upload images.
You can also use this OpenAPI definition file below:
{
  "swagger": "2.0",
  "info": {
    "title": "KYC Image Upload API",
    "version": "1.0"
  },
  "paths": {
    "/upload": {
      "post": {
        "x-amazon-apigateway-integration": {
          "uri": "arn:aws:apigateway:{region}:lambda:path/2015-03-31/functions/arn:aws:lambda:{region}:{account-id}:function:upload_image/invocations",
          "httpMethod": "POST",
          "type": "aws_proxy"
        },
        "responses": {
          "200": {
            "description": "Image uploaded successfully"
          },
          "400": {
            "description": "Invalid input"
          },
          "500": {
            "description": "Internal server error"
          }
        },
        "parameters": [
          {
            "name": "Content-Type",
            "in": "header",
            "required": true,
            "type": "string"
          },
          {
            "name": "body",
            "in": "body",
            "required": true,
            "schema": {
              "type": "object",
              "properties": {
                "image_data": {
                  "type": "string"
                },
                "user_id": {
                  "type": "string"
                }
              },
              "required": ["image_data", "user_id"]
            }
          }
        ]
      }
    }
  }
}
Make sure you replace the region and accountid placeholders.
Step 4: Set Up S3 Event Notification
Configure S3 to Trigger Lambda:
- Open theS3 Console .
- Select your bucket.
- Go to "Properties" -> "Events".
- Add a new event notification:
- Event name:
ImageUploaded - Event types:
s3:ObjectCreated:* - Prefix:
uploads/ - Send to: Lambda Function
- Lambda function:
process_image
- Event name:
- Click "Save".
Step 5: Create SNS Topics
There are three SNS (Amazon Simple Notification Service) topics involved, each serving a specific function in the KYC image processing pipeline:
- ImageProcessingTopic:
- Function: This SNS topic is used to notify downstream components, such as the
validate_imageLambda function, about the completion of image processing by theprocess_imageLambda function. - Trigger: The
process_imageLambda function publishes a message to this topic once it has finished processing an image and storing the results in DynamoDB. - Message Format: The message published to this topic may include details such as the image key, processing status (success or failure), and any extracted information from the image analysis.
- Subscribers: The
validate_imageLambda function is subscribed to this topic to receive notifications and trigger validation and further processing of the KYC data.
- Function: This SNS topic is used to notify downstream components, such as the
- ImageProcessingSuccessTopic:
- Function: This SNS topic is dedicated to notifying subscribers about successful image processing and KYC verification results.
- Trigger: The
validate_imageLambda function, upon successful validation of the processed image data stored in DynamoDB, publishes a success message to this topic. - Message Format: The message published to this topic typically includes details confirming successful validation, such as the user ID, verification status, and any relevant metadata.
- Subscribers: Any downstream systems or services that need to be informed about successful KYC verifications can subscribe to this topic to receive notifications.
- ImageProcessingFailureTopic:
- Function: This SNS topic is dedicated to notifying subscribers about failed image processing or validation attempts.
- Trigger: If the
validate_imageLambda function encounters an issue during validation or if the processed data does not meet the validation criteria, it publishes a failure message to this topic. - Message Format: The message published to this topic includes details about the failed validation, such as the user ID, error message, and potentially diagnostic information for troubleshooting.
- Subscribers: Any systems or teams responsible for handling failed KYC verifications or addressing validation issues can subscribe to this topic to receive notifications and take appropriate actions.
- Create SNS Topics:
- Open the SNS Console.
- Create three topics:
ImageProcessingTopicImageProcessingSuccessTopicImageProcessingFailureTopic
- Configure SNS to Trigger Lambda:
- Set up the
validate_imageLambda function to be triggered by messages published to theImageProcessingTopic.
- Set up the
By using separate SNS topics for different notification purposes, the architecture maintains modularity, flexibility, and clarity in handling different types of events and outcomes during the KYC image processing workflow. It allows for targeted notifications to specific components or teams based on the nature of the event (success or failure) and facilitates effective coordination and response handling within the system.
Step6: Create DynamDB Table
In this architecture, DynamoDB serves as the persistent storage layer for storing the results of image processing and KYC verification. By utilizing DynamoDB as the backend database, the architecture maintains data integrity, supports real-time processing, and enables seamless integration with other AWS services within the serverless environment.
To create the required DynamoDB table for this architecture, you can follow these steps:
- Access AWS Management Console:
- Sign in to the AWS Management Console:.
- Navigate to DynamoDB:
- Go to the DynamoDB service from the AWS Management Console.
- Create a New Table:
- Click on the "Create table" button to start creating a new DynamoDB table.
- Configure Table Settings:
- Enter table name, "KYCResults".
- Specify the primary key for the table. This could be a composite key depending on your data model. For our example, we have "ImageKey" as the sort key and "UserId" as the partition key.
- Configure Additional Settings:
- Adjust any additional settings such as provisioned capacity (read/write capacity units) or enable auto-scaling based on your expected workload.
- Create the Table:
- Click on the "Create" button to create the DynamoDB table.
Step 7: Test Your Image Processing Pipeline
Prepare the Test Environment
- Upload Reference Image:
- Ensure the reference image,
reference/face.jpg, is uploaded to your S3 bucket in the correct location. This image will be used for face comparisons by the process_image function. I found a good refrenece image here.
- Ensure the reference image,
Using Python
Python provides a simple way to encode images in base64 using the built-in base64 module. Here is an example:
- Python Code to Encode an Image:
import base64

# Path to the image file
image_path = 'path/to/your/image.jpg'

# Read the image file
with open(image_path, 'rb') as image_file:
    image_data = image_file.read()

# Encode the image data in base64
encoded_image = base64.b64encode(image_data).decode('utf-8')

# Print the base64 encoded image
print(encoded_image)
- Save and Run the Script: Save the script as
encode_image.pyand run it:
python encode_image.py- Output: The script will print the base64 encoded image string. This string can be used in your API request.
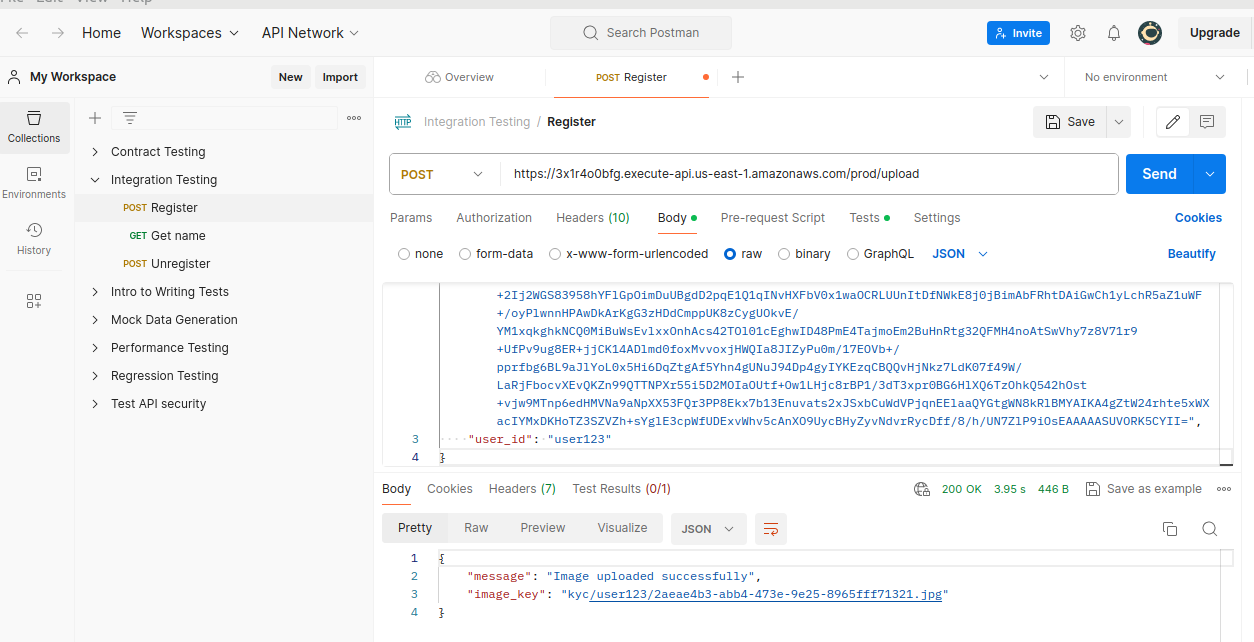
Using Postman
Postman is a popular tool for testing APIs. It can also help you encode files in base64.
- Open Postman: Download and install Postman from postman.com.
- Create a New Request:
- Open Postman and create a new request.
- Set the request method to
POST. - Enter the URL of your API endpoint.
- Prepare the Image Encoding:
- Go to the "Body" tab.
- Select "raw" and then "JSON" from the dropdown menu.
- Add the Base64 String to the Request:
- Copy the base64 string from the online tool or the Python script.
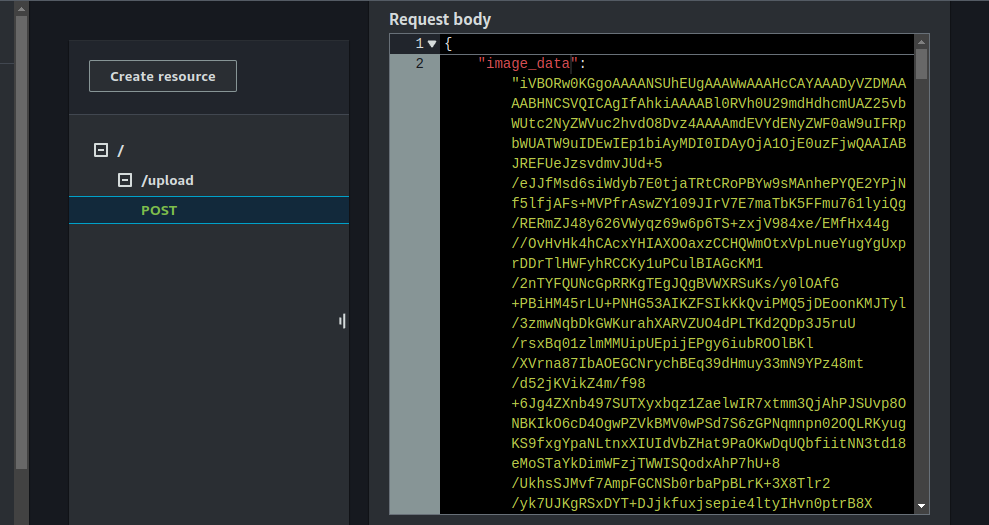
- In the "Body" section of Postman, enter the following JSON structure:
python encode_image.pyReplace <base64-encoded-image> with the actual base64 string.
- Send the Request:
- Click "Send" to send the request to your API endpoint.
- Check the response to verify that the image upload was successful.
Using cURL
If you prefer using the command line, you can use cURL to encode an image and send it as a base64 string in a POST request.
- Encode the Image:
- Use the
base64command-line tool (available on Unix-like systems) to encode an image.
- Use the
base64 path/to/your/image.jpg > encoded_image.txt- Prepare the JSON Payload:
- Open the
encoded_image.txtfile and copy the base64 string. - Enter a random userid. e.g: user123
- Create a JSON file (e.g.,
payload.json) with the following content:
- Open the
{
    "image": "<base64-encoded-image>"
    "user_id": "user123"
}
Replace <base64-encoded-image> with the actual base64 string from encoded_image.txt.
- Send the Request with cURL:
curl -X POST https://<api-id>.execute-api.<region>.amazonaws.com/prod/upload \
-H "Content-Type: application/json" \
-d @payload.json
You can even test from the API gateway directly.
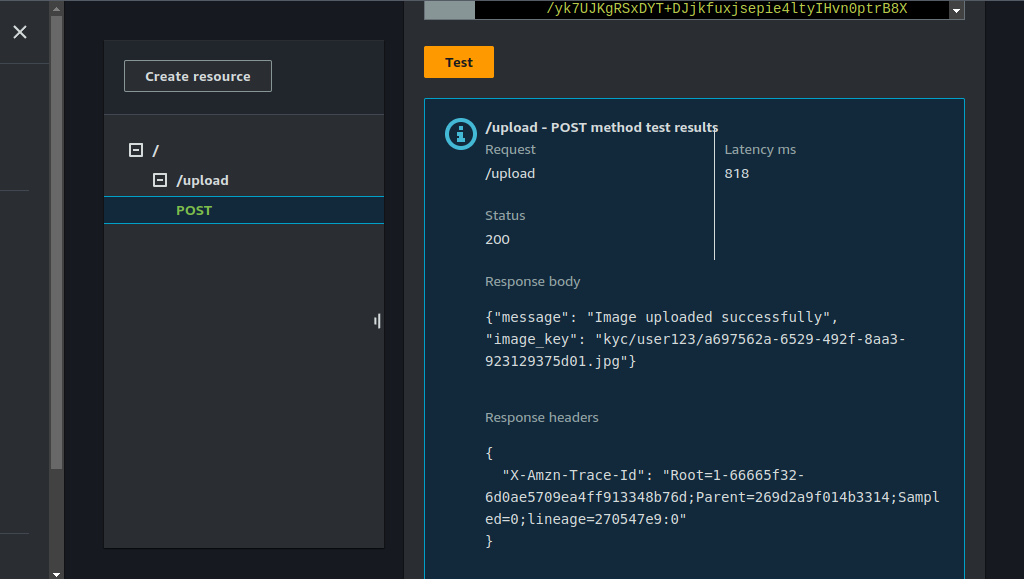
The DynamoDB table also persisted important metadata - as expected.

How This Architecture Aligns with AWS Well-Architected Framework
This architecture aligns with AWS Well-Architected principles, which are designed to help you build secure, high-performing, resilient, and efficient infrastructure for your applications. Let's examine how this KYC image processing pipeline adheres to each of the AWS Well-Architected Framework's five pillars:
1. Operational Excellence:
- Design for Operations: The use of AWS Lambda for the business logic allows for easy monitoring, troubleshooting, and updates. Each Lambda function is designed for a specific task, making it simpler to manage and operate.
- Infrastructure as Code: Infrastructure components such as API Gateway, Lambda functions, S3, DynamoDB, and SNS can be managed using AWS CloudFormation or the AWS CDK (Cloud Development Kit), ensuring consistent and repeatable deployments.
2. Security:
- Identity and Access Management: IAM roles and policies restrict access to the resources to only those services and users that require it. S3 bucket policies, Lambda execution roles, and DynamoDB access policies are all configured to follow the principle of least privilege.
- Data Protection: Data is encrypted at rest (using S3, DynamoDB, and other storage services) and in transit (using HTTPS for API Gateway). AWS Key Management Service (KMS) can be used to manage encryption keys.
- Automate Security Best Practices: AWS services such as AWS Config and AWS CloudTrail help in continuously monitoring and automating security best practices.
3. Reliability:
- Automated Recovery: AWS Lambda and other services are designed to automatically scale and handle failures. For example, S3 event notifications ensure that if a processing function fails, it can be retried.
- Distributed System Design: The use of multiple AWS regions and availability zones ensures high availability and disaster recovery capabilities.
- Monitoring and Logging: AWS CloudWatch is used for monitoring and logging, providing insights into the health and performance of the application. Alerts and automated responses can be set up to handle failures.
4. Performance Efficiency:
- Serverless Computing: The use of AWS Lambda allows the architecture to scale automatically with the load. There is no need to manage servers or provision capacity in advance.
- Event-Driven Architecture: By utilizing S3 event notifications and SNS, the system efficiently handles spikes in load and ensures that processing is performed only when necessary.
- Optimized Data Storage: DynamoDB provides fast and predictable performance with seamless scalability.
5. Cost Optimization:
- Pay-as-You-Go: The serverless nature of Lambda, API Gateway, and other AWS services ensures that you only pay for what you use. This is cost-effective compared to running always-on instances.
- Right-Sizing: AWS services automatically scale with the workload, ensuring that resources are not over-provisioned.
- Analyze and Optimize Costs: AWS Cost Explorer and AWS Budgets can be used to monitor and optimize costs continuously.
Final Thoughts
This guide provides a robust framework for implementing a modern KYC system using AWS's serverless architecture. By leveraging services such as API Gateway, Lambda, S3, DynamoDB, Rekognition, and SNS, we can create a secure, scalable, and efficient image processing pipeline that automates and enhances the KYC verification process. This architecture not only meets the demands of contemporary digital services but also ensures regulatory compliance and user trust.
We could also improve on this architecture in different ways. For example, by using a step functions workflow and by adding checks for already existing images before alidating the kyc process. You can follow this project or this one to learn how to implement step functions in AWS.
This AWS-powered next-gen KYC architecture follows the Well-Architected principles by utilizing a serverless, event-driven approach. This design ensures operational excellence, security, reliability, performance efficiency, and cost optimization. By leveraging AWS's managed services, the system is both resilient and scalable, providing a robust framework for secure and efficient KYC processing.
Happy Clouding !!!
Did you like this post?
If you did, please buy me coffee 😊